Turning a POWER WASHER into a MINI BIKE

“When I was a kid, my neighbors had a go-kart, a pedal cart, and a seemingly endless supply of dirt bike, scooter, and minibike projects. I spent the better part of my childhood trying (and failing) to make my own go-karts and other motor powered vehicles using anything and everything I could find.
My dad didn’t have many tools, but everyday I would sneak into the garage to borrow his mismatched wrench and ratchet set. Regularly missing tools drove him nuts. Let’s just say kids aren’t very good about putting tools back.”
When I became an adult with space of my own, one of my first priorities after cobbling together a personal toolkit was to actualize my childhood dream of making a motor powered… something.
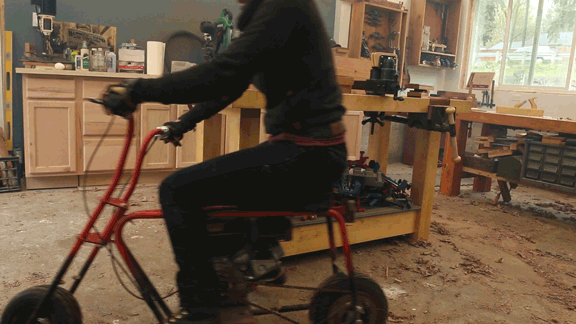
So, when I found a power washer and a kid’s bike in the neighbor’s trash pile, five-year-old Anne got VERY excited. I’d just scored an ancient welder on Craigslist and went right to work using a hacksaw and a lot of trial and error to combine the bike and washer into a frame that I could mount the motor onto.
Later, I salvaged some brake parts off an electric scooter I also found in the trash.
This was actually one of my very first multimedia projects as I started setting up my “make everything” shop in Seattle after moving from Taiwan.


I modified the aluminum brake parts I found on that trashed scooter on my woodturning lathe with woodturning tools (aluminum is soft enough to cut with most wood cutting tools).
That frame was clunky at best, and I ended up trading my drill press for a better bike frame because I realized that there was no point in trying to improve that first iteration of the project any further.
My new frame had a bunch of problems as well. The chain kept falling off, the brakes didn't work all that well and the wheel kept falling off.
“(Wheels falling off seems to be a recurring theme in my life, remember the inaugural drive in my 1953 Chevy truck?)”

This project was such a head scratcher, I even called in the big guns, in the form of my woodworking-mentor-turned-grandfather-figure, Frank. He and I put our heads together to solve a lot of the first problems the bike faced.
Frank taught me about Centrifugal Clutches and officially blew my mind. Centrifugal clutches act like a transmission of sorts for simple motors and are built to just spin the entire time they are turned on.
Without a clutch, pulling the cord to start the motor would move the bike forward, and once the motor was started, the bike would be constantly driving forward.
But unfortunately we realized that the drive shaft (the piece that holds the chain). on the washer motor was too short, and thus, no way to attach the centrifugal clutch onto the shaft. So, to Harbor Freight I went to purchase another motor.
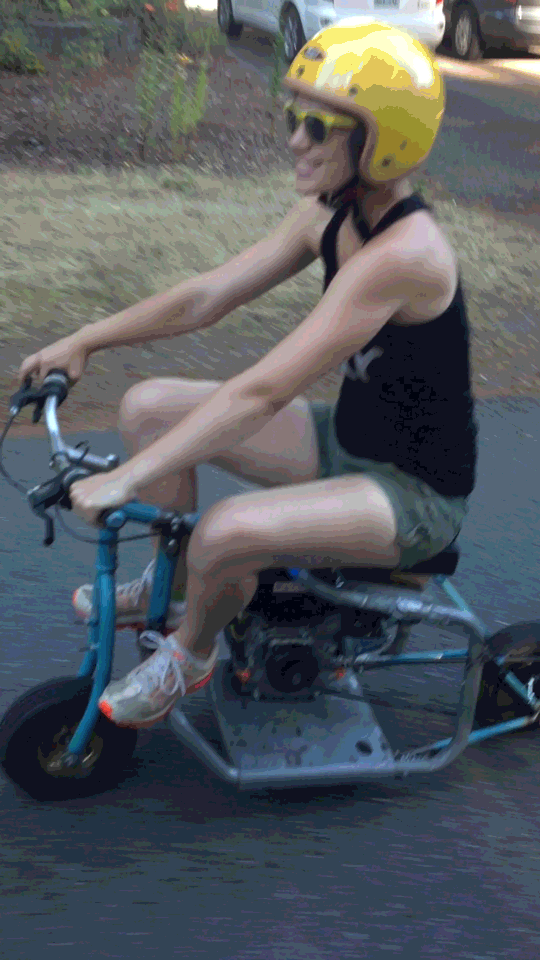
As we prepared to move to Nashville, I had no real intentions of bringing the mini bike project, that is, until I found out my neighbor Caleb (remember the golf cart?) is also a huge fan of mini bikes, and he had several similar project bikes in his garage, so I tossed it in the moving truck and it made the 3,000 mile journey here. Caleb and I got right to work modifying my mini bike, and had a blast making it even sillier than it was before.
The first thing Caleb and I had to do was get this thing to stop losing it’s chain. Part of my problem was how I had the motor mounted on the frame, offset way to one side (which made the bike very unbalanced) to accommodate how far the centrifugal clutch (the simple “transmission” piece which allows us to use constant motion motors for projects like this) stuck out too far, but as it turns out these centrifugal clutches can actually go on both ways, and I essentially had it on backwards, so once it was turned around, the motor could be mounted normally on the frame.
Caleb suggested that we put a new wheel on the bike and, at the time, I thought that was for some, you know, safety or structural reason, but it turns out it's because he wanted to stretch out the frame and put a racing slick on the back, and in that process, the bike became a whole lot less unsafe and therefore a whole lot more fun. Racing slicks are just what they sound like, tires meant for racing that are “slick,” as in they have no tread, so they are very slippery, but the lack of tread causes less friction with the road when the tire is spinning, so higher speeds are possible.
Welding on the brackets to stretch the frame (aka make it longer to accommodate the bigger tire), presented it’s own series of unique problems, we had to create a new mounting bracket for my salvaged brake parts. The racing slick we bought had built in tabs that for mounting a specialized brake kit (that we obviously didn’t have), so we had to cut the tabs off and so the tabs wouldn’t hit our brackets as the wheel spun.
We also had to use Caleb’s hydraulic press to press the pre-fit bolts on the tire assembly out, as they were also too long for our application and we had to substitute our own, shorter bolts. Finally, we had to make a new wheel axle, for which we were able to repurpose an extra tire iron Caleb had laying around his shop. We cut it to the proper length, threaded one side, and welded a nut to the other side.
To make the brakes work, we welded on a little “holding tab” to hold the brake parts in proper position. I ordered a generic bike brake cable kit to replace the one I had, which was rusted out. Caleb found a nut that would work to hold the brake cable, drilled a hole in it to accommodate the cable, and mounted the whole assembly through the welded tab.
The whole assembly is ugly as sin, but we now have a correctly mounted motor, the bike is far less likely to dump its chain now, the brake assembly is functional, and this old gal is ready to ride.
We got the racing slick and all the other parts we needed that we couldn't just find laying around in Caleb's garage from https://www.gopowersports.com.